Fast Log Entry (FLE) - Step-by-Step - Version 3.3
Contents
- What's new in Version 3
- Sample log files
- Header Section
- Entering QSOs
- Band or Frequency
- Off-Line and Real-Time Logging
- Typing or logging errors
- Optional information
- Changing date, band and mode
- Interpolating log times
- Exporting QSOs in ADIF
- Uploading logs to LoTW
- Uploading logs to eQSL.cc
- Exporting Cabrillo
- Saving the log file
- Editor Options
- Other Options
- More hints
- Keyboard shortcuts
- Keywords
- Valid Bands and Frequencies
- Valid Modes
What's new in Version 3
Changing from 32-bit to 64-bit application with a new installer. When starting FLE V3 it automatically takes all your settings from your installed FLE V2 version. FLE V2 can be deinstalled afterwards.
- Updates of the log grid are now significantly faster. Under one second even with large logs.
- The log grid can be sorted by any column ascending or descending by clicking on the column headers.
- A filter check box to show any possible log errors.
- New option for immediate log grid updates after each new QSO.
- New option to fold date ranges in the log (Date folding).
- New option to show log modifications.
- Time interpolation improved.
- The DATE keyword is now optional and no longer mandatory.
- New keyword MYGRID to export the logging station's grid locator in ADIF.
- The QSO partner's name can be entered and exported in ADIF.
- Modes FT4 and JS8 added.
Sample log files
Note: ADIF log files (*.adi) may not be loaded into the log editor! Only text files (*.txt).
Four different sample log files can be loaded by clicking on one of the Load sample log menu items under the Help Menu.

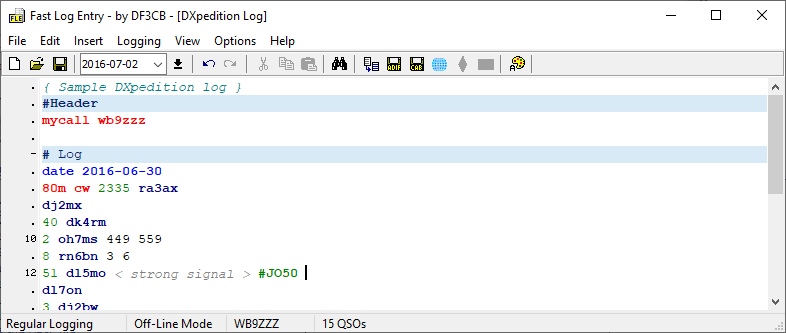
The examples below are taken from the DXpedition sample log.
Header Section
Beginning with FLE 2.7 your Station Call Sign and - optionally - the Operator, your own WWFF and SOTA references are now stored in each log as header lines with the following keywords (all keywords are not case-sensitive):
| 1 | mycall wb9zzz |
| mygrid en60br | |
| 2 | operator |
| 3 | qslmsg Please QSL via bureau |
| 4 | mywwff KFF-0156 |
| 5 | mysota W7A/AP-001 |
| 6 | mypota K-0003 |
| 7 | nickname Home QTH |
The mycall keyword is your Station Call Sign and it is mandatory. This is the logging station's call sign (the call sign used over the air). Saving ADIF files without your own call is prevented. There is only one unique station call sign per log. If you use another call on the air, use a new log.
Your call sign is shown in the lower status bar:
![]()
The logging station's 4- or 6-character grid locator can optionally be exported in ADIF (tag MY_GRIDSQUARE) using the header keyword mygrid. It is not mandatory.
The call sign of the Operator can optionally be added to the ADIF file, it is not mandatory. Use the operator keyword and add the call sign of the operator. It can be different from the Station Call Sign but it may not be the name of the operator! The operator keyword can be repeated further down the log with other operator call signs if you had more than one and if they changed.
The optional qslmsg keyword is used to add the same QSL Message Text to each QSO in the ADIF file. This can be useful e.g. for eQSL.cc. It is not mandatory but valid for the entire log once entered here. QSL Messages can alternatively be entered in single QSO lines and are embedded in square brackets []. See the Optional information paragraph. They overwrite this qslmsg header text.
The mywwff keyword is used to register your own WWFF reference number in WWFF Logging. See also chapter WWFF logging. The syntax is: AAFF-CCCC: AA = national prefix, CCCC = 4-digit numeric code (e.g. ONFF-0001).
The mysota keyword is used to register your own SOTA reference number in SOTA Logging. The syntax is: AA/NN-CCC: Association/Name-3-digit numeric Code (e.g. G/CE-001). Your own SOTA reference number is mandatory for SOTA Logging.
The mypota keyword is used to register your own POTA park reference number in POTA Logging. See also chapter POTA logging. The syntax is: A-CCCC: A = national prefix, CCCC = 4-digit numeric code (e.g. K-0001).
The nickname keyword can be used for eQSL ADIF uploads. See chapter Uploading logs to eQSL.cc.
If you use the same call on the air but from different WWFF or SOTA references, use a new log.
The required header lines are inserted either automatically or by Insert Menu > Insert Log Header or by using the keyboard shortcut Alt+C.
Entering QSOs
Now start your log with the date of the first QSO using the Keyword DATE. DATE is not case-sensitive, all keywords are not case-sensitive.
| 1 | date 2016-10-30 |
The keyword DATE is optional and not mandatory. You can also enter the date directly.
| 1 | 2016-10-30 |
The Date Format is year-month-day (yyyy-mm-dd) and there are no other date formats. As long as the date is not completely entered or not valid the date entry is higlighted with a yellow background color.
| 1 | date 2016-1 |
| 2 | date 2016-13-05 |
Year, month and day may be typed abbreviated and you may use any separators other than dash.
| 1 | date 16/2/1 |
Hint: The current date can be inserted at the cursor position using the function key F1.
Now enter Band and Mode of your first QSO. It can be any band according to the ADIF specifications (160m, 80m, 40m...) and any mode (for example CW, SSB, RTTY). Find the list of valid bands and valid modes at the bottom of this page.
| 1 | date 2016-10-30 80m cw |
Date, band and mode can be entered in a single line or in separate lines.
| 1 | date 2016-10-30 |
| 2 | 80m cw |
Now enter your QSOs each in a new line with Time (in UTC!) and Call Sign (in this sequence).
| 1 | date 2016-10-30 |
| 2 | 80m cw |
| 3 | 2335 ra3ax |
Hint: The current UTC time can be inserted at the cursor position using the function key F2.
Everything can be entered in one line as well but each new QSO must be entered in a new line.
| 1 | date 2016-10-30 |
| 2 | 80m cw 2335 ra3ax |
Next QSO is with DJ2MX at the same minute (2335). The minute hasn't changed from the previous QSO. So all you need to do is to enter the call sign.
| 1 | date 2016-10-30 |
| 2 | 80m cw 2335 ra3ax |
| 3 | dj2mx |
Next QSO is at 2340. You enter only the changed part of the time compared to the previous QSOs.
| 1 | date 2016-10-30 |
| 2 | 80m cw 2335 ra3ax |
| 3 | dj2mx |
| 4 | 40 dk4rm |
Next QSO is at 2342. The changed part of the time is minute 2. You have given OH7RM 449 and received 559 from him. Entry of sent and received reports is only needed if they differ from standard reports 59/599.
| 1 | date 2016-10-30 |
| 2 | 80m cw 2335 ra3ax |
| 3 | dj2mx |
| 4 | 40 dk4rm |
| 5 | 2 oh7ms 449 559 |
In fact, only the first relevant numbers of the report need to be entered, e.g. 44 is 449 and 5 will be translated into 559.
| 5 | 2 oh7ms 44 5 |
If you have received 559 but sent standard report 599, both sent and received reports need to entered (in this order).
| 5 | 2 oh7ms 9 5 |
Again, all information for one QSO must be entered in one line. Each new QSO must be a entered in a new line. A valid QSO line contains at least a call sign.
| 1 | date 2016-10-30 80m cw 2335 ra3ax |
| 2 | dj2mx |
| 3 | 40 dk4rm |
| 4 | 2 oh7ms 449 559 |
| 5 | |
| 6 | 50 ku1t 15m jt65 -17 -12 |
Empty lines are ignored, you can enter as many as you want.
Note: Standard reports are automatically added - if missing - with:
- 59 for Phone modes SSB, AM, FM
- 599 for CW, RTTY, PSK
- -10 for the WSJT modes JT65, JT9, JT6M, JT4, JT44, FSK441, FT8, FT4, ISCAT, MSK144, QRA64, T10, WSPR.
Reports other than standard reports or for modes not listed above should be entered in the QSO line.
Hint: Use the function key F5 to update the Log Grid from time to time to view all QSOs.
Band or Frequency
Bands are usually entered in FLE:
| 2 | 80m cw 2335 ra3ax |
You can alternatively enter the frequency in MHz you were operating on:
| 2 | 3.525 cw 2335 ra3ax |
One decimal point (dot) is required in FLE to be identified as frequency. Frequencies are exported with three places after the decimal point.
FLE always exports the band. If the band is empty, the band is determined from the Valid Bands and Frequencies table below.
If the frequency doesn't match the band frequency range, it ist highlighted as error:
| 2 | 4.10 cw 2335 ra3ax |
You can also enter both band and frequency but the entered frequency must match the frequency range of that particular band:
| 2 | 80m 3.525 cw 2335 ra3ax |
If the entered frequency will not match the frequency range, the frequency will not be exported in the ADIF file. The band has priority:
| 2 | 80m 4.10 cw 2335 ra3ax |
Off-Line and Real-Time Logging
FLE is by default an off-line QSO editor but FLE can also be used as a simple and effective real-time logger. Click on Real-Time Mode in the Logging menu:
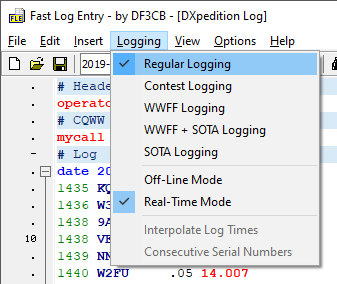
Logging type and logging mode are shown in the lower status bar:
![]()
Enter at least a valid call sign and hit the ENTER key.
| 9 | yo3jw |
The current UTC time will automatically be added in front of the QSO line.
| 9 | 1454 yo3jw |
Hint: The current UTC time can alternatively be inserted by using function key F2.
Typing or logging errors
Typing or logging errors are indicated with yellow background color, in particular date, time and call sign errors. February doesn't have 30 days, 1860 is not a valid time and call signs may e.g. not contain a question mark. Date, time and call sign errors are shown in red in the Log Grid Panel and you cannot save the ADIF file unless you have fixed all errors.
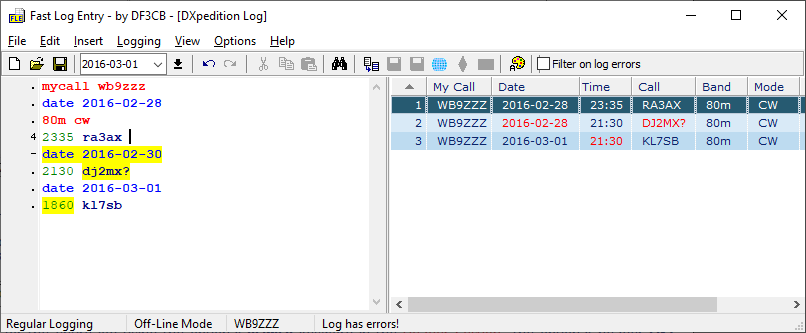
Optional information
FLE can also export QSO Comments, Names, Grid Locators and QSL Messages for a single QSO. QSO comments must be embedded in brackets <>, the QSO partner's name must have a preceeding @, grid locators must have a preceeding hash # and QSL Messages must be embedded in square brackets [].
| 9 | 51 dl5mo < strong signal > @Bernd #JO50 [QSL message] |
QSL Messages can alternatively be set for the entire log using the optional qslmsg keyword in the Header Section. The optional header QSL Message Text is added to each QSO in the ADIF file. It is then valid for the entire log once entered there. QSL Messages entered in single QSO lines overwrite the QSL Message of the header. An empty message [] generates no QSL Message in the ADIF file.
Remarks can be embedded in curly braces {}. Remarks are not exported in ADIF.
| 1 | { Sample FLE DXpedition log } |
Remarks can also be set in lines marked with a hash # at the first position:
| 311 | # next day |
| 312 | day + |
Changing date, band and mode
If your log continues on the next day, you can use the DAY Keyword and the + sign (plus).
| 13 | day + |
If your log continues two (or more) days later, use two (or more) + signs. Based on the last date 2016-10-30 the day ++ command will set the date to 2016-11-01.
| 13 | day ++ |
Change of date, day, band and mode can be entered either before or in a new QSO line in any order.
| 13 | day ++ 40m ssb |
or
| 13 | ssb 40m day ++ |
or
| 13 | day ++ |
| 14 | 40m |
| 15 | ssb |
Interpolating log times
If you had a high QSO number in a Contest or on a DXpedition, interpolation of times is useful. Be sure to check Interpolate Log Times in the Logging Menu. This option is only available in the Off-line Logging Mode.
Enter a start time and the next time every 20 minutes or so. FLE will interpolate the missing non-entered times based on the first and the last entered time.
| 20 | 0014 g3fpq |
| 21 | ra6au |
| 22 | oh2pj |
| 23 | oh3es |
| 24 | sm5wp |
| 25 | f5lge |
| 26 | sp8brq |
| 27 | 38 ua3tcj |
Contest Logging
Contests require the entry of serial numbers and/or consecutive serial numbers. Check Contest Logging in the Logging Menu.
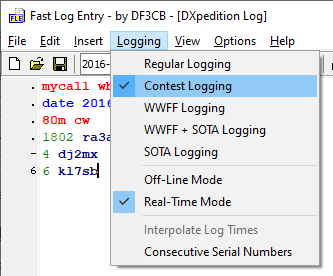
Sent exchanges must have a preceeding , (comma) and received exchanges a preceeding . (dot).
| 18 | 1856 ku1t ,337 .781 |
Standard reports other than 59/599 do not need to be entered. If they differ from 59/599 enter them in the full or the abbreviated format.
| 18 | 1856 ku1t 579 ,337 589 .781 |
| 18 | 1856 ku1t 7 ,337 8 .781 |
If consecutive serial numbers are to be sent, check Consecutive Serial Numbers in the Logging Menu. No more need to enter your own serial number; just enter the received serial number.
| 18 | 1856 ku1t .781 |
WWFF Logging

 |
The WWFF Logging option is an extension to FLE to support the World Wide Flora and Fauna in Amateur Radio Program. Please visit To submit your log to WWFF some extra ADIF fields are required, see |
Your own activator's WWFF reference can be entered in the Header Section using the keyword mywwff.
The reference numbering is XFF-YYYY or XXFF-YYYY (X or XX depending on the national prefix, YYYY four numbers 0001-9999). The ADIF field is MY_SIG_INFO and is valid for the entire log. If you enter an own WWFF reference MY_SIG is set to “WWFF”.
If your QSO partner/hunter has a WWFF reference enter it by using the keyword wwff:
| 1 | date 2016-04-10 40m ssb 2335 m0yza wwff gff-0002 |
The wwff keyword is not required but the reference is always validated.
| 1 | date 2016-04-10 40m ssb 2335 m0yza gff-0002 |
| 2 | 37 on4vt onff-3 { not valid, must be 4 numbers} |
The ADIF field SIG_INFO is used for this reference and SIG is set to “WWFF”.
You should also enter your Station Call Sign (mycall) and Operator Call Sign (operator) as shown in the Header Section.
- Station Call Sign is the call sign used to activate.
- Operator is the call sign of the operator. It can be different from the Station Call Sign but it may not be the name of the operator.
SOTA Logging
 |
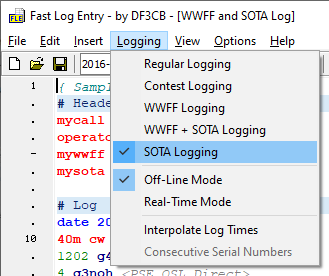
The SOTA Logging option is an extension to FLE to support the Summits on the Air Program. Please visit Your own activator's Summit reference must be entered in the Header Section using the keyword mysota. You must also enter your Station Call Sign (mycall) as shown in the Header Section. |
If your QSO partner/hunter has a SOTA reference enter it by using the keyword SOTA :
| 1 | 1716 dl/on6zq/p sota dl/al-093 |
The sota keyword is not required but the reference is always validated.
| 1 | 1716 dl/on6zq/p dl/al-093 |
| 2 | 28 on4vt/p on/on-3 { not valid, must be 3 or 4 numbers} |
The syntax is: AA/NN-CCC: Association/Name-3 or 4-digit numeric Code (e.g. G/CE-001). The list of associations, regions and codes can be found here: ![]() www.sota.org.uk/Associations.
www.sota.org.uk/Associations.
WWFF and SOTA Logging can be used simultaneously by checking the WWFF + SOTA Logging option. Both WWFF ADIF files and SOTA CSV files can be generated then.
POTA Logging
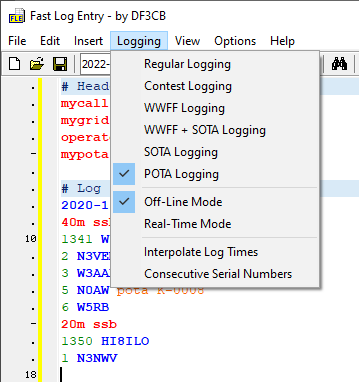
 |
The POTA Logging option is an extension to support the Parks on the Air Program. Please visit To submit your log to POTA some extra ADIF fields are required, see |
Your own activator's POTA reference can be entered in the Header Section using the keyword mypota.
The reference numbering is X-NNNNN (X depending on the national prefix, NNNNN four or five numbers 0001-99999). The ADIF field is MY_SIG_INFO and is valid for the entire log. If you enter an own POTA reference MY_SIG is set to “POTA”.
If your QSO partner/hunter has a POTA park reference enter it by using the keyword pota :
| 1 | 1345 n0aw pota k-0003 |
The ADIF field SIG_INFO is used for this reference and SIG is set to “POTA”.
You must enter your Station Call Sign (mycall) and optionally your Operator Call Sign (operator) as shown in the Header Section.
- Station Call Sign is the call sign used to activate.
- Operator is the call sign of the operator. It can be different from the Station Call Sign but it may not be the name of the operator.
Log file naming convention
The call area managers receive hundreds of logs each month. In order to help locate and process your log file it must be named such that it can be identifed without opening the file. Either file type .ADI or .ADIF is acceptable. Supplemental comment information may follow the mandatory fields to indicate location, log patches, etc. Only alphanumbic characters, dashes, underscores, at symbol and period are allowed. Avoid spaces, other punctuation and accents in your log filenames.
STATION_CALLSIGN@REFERENCE-LOCATION-QSODATE-SUPPLEMENTAL.adi
Example: W8TAM@K-3315_20191031-0900.adi
This filename shows W8TAM was at K-3315 on Oct 31, 2019.
Exporting QSOs in ADIF
Click on the Update Log Grid button or hit function key F5 to fill the log data grid with the QSO records. Click on the Save ADIF File button or use the shortcut key Ctrl-I to export the QSO data into an ADIF file (the log data grid is automatically updated when saving the ADIF file). The ADIF file can be imported into your logging software or uploaded to LoTW or eQSL.cc.
It is mandatory to enter your Station Call Sign in the Header Section before saving ADIF.
Uploading logs to LoTW
Please consider using LoTW, the![]() ARRL Logbook of The World.
ARRL Logbook of The World.
FLE has an integrated ADIF log upload to LoTW using TQSL. Prerequisites are that you are a registered LoTW user, you have TQSL 2 and your LoTW certificate(s) installed and you have set one or more station locations. Once the ADIF log is saved on disk, the Upload ADIF to LoTW menu item and button are enabled. The LoTW ADIF Upload dialog pops up and your log call sign is preset. If you have more than one station location be sure to select the right one before hitting the Upload button.
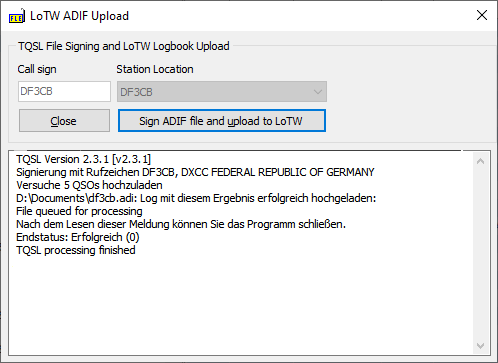
TQSL is launched in the background. The TQSL messages are captured and displayed in the dialog. Please check the reasons if an upload has not been successful.
Uploading logs to eQSL.cc
FLE has also an integrated ADIF log upload to eQSL.cc. Prerequisites are that you have a valid eQSL.cc account with an eQSL user and password. Once the ADIF log is saved on disk, the Upload ADIF to eQSL.cc menu item and button are enabled. The eQSL.cc ADIF Upload dialog pops up and your log call sign is preset as eQSL User as well as the eQSL account password and an optional QTH Nickname. The password can be saved and preset again for the next eQSL uploads if you check Save Password.
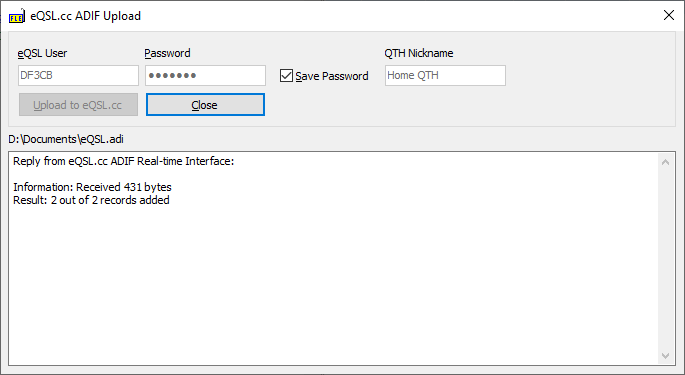
Please note that the eQSL User ID can be different from the call sign of your portable activity and your log. If you have different WWFF or SOTA portable activities and want to upload your logs to eQSL, you should register new attached accounts in eQSL.cc using different unique QTH Nicknams for these activities. The QTH Nickname can be entered in the Header Section of each log using the keyord nickname. Example:
| 1 | nickname Home QTH |
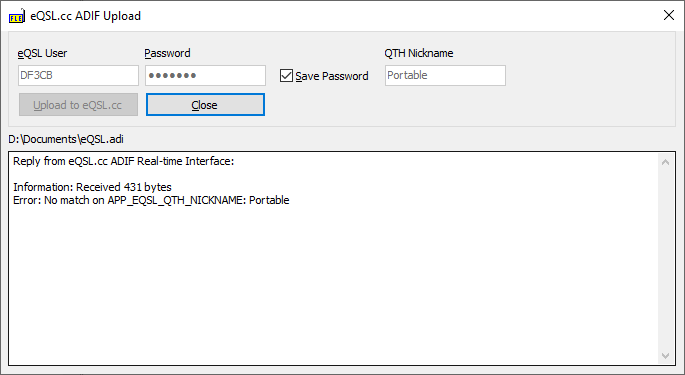
The ADIF file is then exported with the ADIF field APP_EQSL_QTH_NICKNAME.
A wrong QTH Nickname is reported as error by the eQSL ADIF web interface and the log rejected:
Exporting Cabrillo
FLE can export in the Cabrillo Format. See the Cabrillo page for more hints.
Saving the log file
The log text file can be saved (Ctrl-S) and opened again at any time. Next time you start FLE the last log file is opened and loaded automatically. Set the Auto Save Log option in the Options menu to let your modified log file automatically be saved once every two minutes.
Editor Options
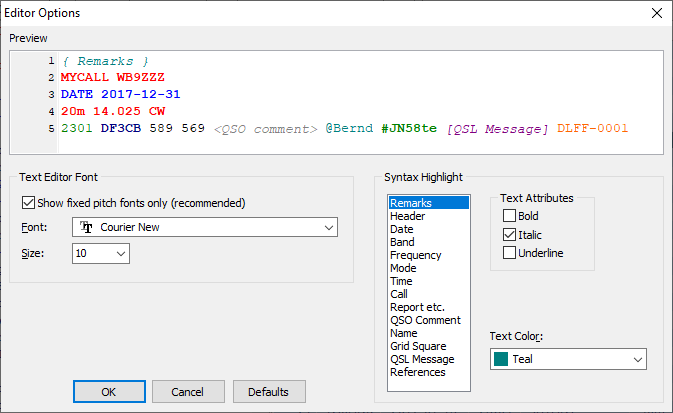
FLE uses context-sensitive highlighting. All QSO data elements can be distinguished by different colors or styles as set in the Editor Options under the Options Menu. You can also set the font and font size of the QSO editor.
Other Options
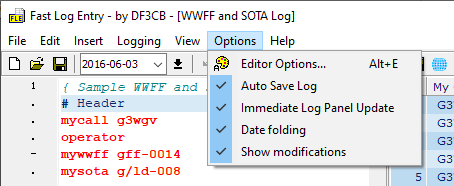
The Auto Save Log option saves a modified log file automatically once every two minutes. Note: if you start your logging session with a new unsaved log file, the log is not saved automatically!
The Immediate Log Panel Update option will rebuild and reload the log grid on the right-hand side as soon as you enter a new QSO. Note: If you have a large log loaded, let's say more than 5000 QSOs and the response time becomes too slow, switch off this option.
You can group your log by date by using the Date folding option. Each or all date ranges can be "folded" or "unfolded" by clicking on the - or + sign on the left indicator bar or by using a right-click context menu option:
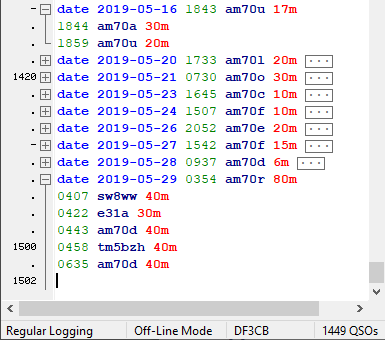
Note: this option is still a bit buggy and will be impoved soon. QRX for an update.
The Show modifications option marks all added or changed QSO lines with a yellow marker to visualize all log changes:
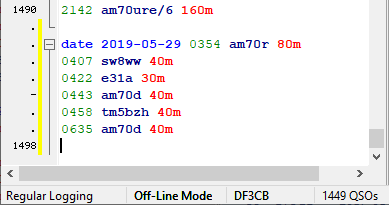
The yellow marker will turn green when the log is saved.
More hints
- The log editor panel can be resized by holding and dragging the splitter between the log editor panel and the QSO log grid.
- Use the TAB key to do a nicer formatting of the entries if you like.
- Note: ADIF log files may not be loaded into the log editor!
Use the F4 function key to hide or unhide the QSO log grid panel or use the View menu:
Keyboard shortcuts
| Shortcut | Function | Shortcut | Function | |
| Ctrl+A | Select all text | F1 | Insert current date at cursor position | |
| Ctrl+B | Choose a band to insert | F2 | Insert current UTC time at cursor position | |
| Ctrl+C | Copy text | F3 | Find next | |
| Ctrl+D | Insert the date picker combo date at the cursor position | Shift+F3 | Find previous | |
| Ctrl+F | Find text | F4 | Hide or unhide log grid panel | |
| Ctrl+H | Replace text | F5 | Update log grid | |
| Ctrl+I | Save the ADIF file | |||
| Ctrl+M | Choose a mode to insert | Alt+C | Insert header lines | |
| Ctrl+O | Open a log file | Alt+E | Editor Options | |
| Ctrl+N | New log file | Alt+X | Exit | |
| Ctrl+S | Save the log file | |||
| Ctrl+V | Paste text | |||
| Ctrl+X | Cut text | |||
| Ctrl+Y | Redo text changes | |||
| Ctrl+Z | Undo text changes | |||
| Ctrl++ | Insert the next day at the cursor position | |||
| Ctrl+Home | Jump to first line | |||
| Ctrl+End | Jump to last line |
Keywords
All keywords are not case-sensitive.
| Keyword | Description |
| mycall | The mycall keyword is your station call sign and it is mandatory. This is the logging station's call sign (the call sign used over the air). Saving ADIF files without your own call is prevented. |
| mygrid | Optional keyword to export the logging station's grid locator as MY_GRIDSQUARE in ADIF either with 4 or 6 characters. |
| operator | The call sign of the operator can optionally be added to the ADIF file, it is not mandatory. Use the operator keyword and add the call sign of the operator. It can be different from the station call sign but it may not be the name of the operator! The operator keyword can be repeated further down the log with other operator call signs if they change. |
| qslmsg | QSL Messages valid for the entire log can be entered in the header section of the log. It is not mandatory. |
| mywwff | The mywwff keyword is used to register your own WWFF reference number in WWFF Logging. See also chapter WWFF logging. The syntax is: AAFF-CCCC: AA = national prefix, CCCC = 4-digit numeric code (e.g. ONFF-0001). |
| mysota | The mysota keyword is used to register your own SOTA reference number in SOTA Logging. The syntax is: AA/NN-CCC: Association/Name-3-digit numeric Code (e.g. G/CE-001). Your own SOTA reference number is mandatory for SOTA Logging. |
| nickname | The nickname keyword can be used for eQSL ADIF uploads. See chapter Uploading logs to eQSL.cc. |
| date | The date format is year-month-day (YYYY-MM-DD), e.g. 2016-12-31. Year, month and day may be abbreviated and you may use separators other than dash. The DATE keyword is optional and not mandatory. |
Valid Bands and Frequencies
| Band | Lower Freq | Upper Freq (MHz) |
| 2190m | .1357 | .1378 |
| 630m | .472 | .479 |
| 560m | .501 | .504 |
| 160m | 1.8 | 2.0 |
| 80m | 3.5 | 4.0 |
| 60m | 5.06 | 5.45 |
| 40m | 7.0 | 7.3 |
| 30m | 10.1 | 10.15 |
| 20m | 14.0 | 14.35 |
| 17m | 18.068 | 18.168 |
| 15m | 21.0 | 21.45 |
| 12m | 24.890 | 24.99 |
| 10m | 28.0 | 29.7 |
| 6m | 50 | 54 |
| 4m | 70 | 71 |
| 2m | 144 | 148 |
| 1.25m | 222 | 225 |
| 70cm | 420 | 450 |
| 33cm | 902 | 928 |
| 23cm | 1240 | 1300 |
| 13cm | 2300 | 2450 |
| 9cm | 3300 | 3500 |
| 6cm | 5650 | 5925 |
| 3cm | 10000 | 10500 |
| 1.25cm | 24000 | 24250 |
| 6mm | 47000 | 47200 |
| 4mm | 75500 | 81000 |
| 2.5mm | 119980 | 120020 |
| 2mm | 142000 | 149000 |
| 1mm | 241000 | 250000 |
Valid Modes
| CW | SSB | AM | FM | RTTY | FT8 | PSK | JT65 | JT9 |
| FT4 (*) | JS8 (*) | |||||||
| ARDOP | ATV | C4FM | CHIP | CLO | CONTESTI | DIGITALVOICE | DOMINO | DSTAR |
| FAX | FSK441 | HELL | ISCAT | JT4 | JT6M | JT44 | MFSK | MSK144 |
| MT63 | OLIVIA | OPERA | PAC | PAX | PKT | PSK2K | Q15 | QRA64 |
| ROS | RTTYM | SSTV | T10 | THOR | THRB | TOR | V4 | VOI |
| WINMOR | WSPR |
The valid bands and modes are synchronized with the ADIF specifications at ![]() adif.org.uk and FLE is compliant with the ADIF standards 3.1.0.
adif.org.uk and FLE is compliant with the ADIF standards 3.1.0.
A distinction is drawn between modes and submodes in ADIF. Please note that FLE only supports modes but no submodes. An example is PSK and it's many submodes like PSK31, PSK63, PSK125, QPSK31, QPSK63, QPSK125, SIM31 and others. PSK31 for example has to be entered as PSK. JT65A has to be entered as JT65 and so on.
(*) FT4 and JS8 are exported as mode MFSK and respectively submode FT4 and JS8 in ADIF: <MODE:4>MFSK <SUBMODE:3>FT4