Tuning the radio
It is very important to have convenient ways to tune your radio remote since you are not sitting in front of it and cannot "turn knobs". FTDXRC offers many ways to accomplish tuning efficiently through keyboard shortcuts, mouse clicks, mouse move, mouse wheel scrolling and external scrolling devices.
Basic Tuning Hints
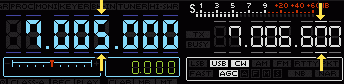 |
The frequency displays of VFO A and B have little bars over and under the digits. Hold the mouse on an upper bar or the upper part of a frequency digit. The cursor changes to a cross and the bars above and below are higlighted white. Click on it to increase the frequency once or keep the left mouse button pressed to keep tuning up. Vice versa for the lower bars and lower parts of the frequency digits. Move the pressed mouse button left or right to faster or slower change frequency, e.g. to scan the band. |
But we recommend to prefer and use keyboard shortcuts for a more precise tuning. For Main VFO A use the shortcuts Ctrl+Left or Ctrl+Right to select the dial digit you want to tune up or down. This can be the 10kHz, 1kHz, 100Hz, 10Hz or 1Hz dial digit.
Use the keyboard shortcuts shown in the table below to directly set the dial step size.
| Dial Step Size | Shortcut VFO A | Shortcut VFO B |
| one higher | Ctrl+Left | Alt+Left |
| one lower | Ctrl+Right | Alt+Right |
| 1 Hz | Ctrl+1 | Ctrl+6 |
| 10 Hz | Ctrl+2 | Ctrl+7 |
| 100 Hz | Ctrl+3 | Ctrl+8 |
| 1 kHz | Ctrl+4 | Ctrl+9 |
| 10 kHz | Ctrl+5 | Ctrl+0 |
| Tune | Shortcut VFO A | Shortcut VFO B |
| up (slower) | Ctrl+Up | Alt+Up |
| down (slower) | Ctrl+Down | Alt+Down |
| up (faster) | Ctrl+Page Up | Alt+Page Up |
| down (faster) | Ctrl+Page Down | Alt+Page Down |
When you have chosen the right dial digit use the shortcuts Ctrl+Up or Ctrl+Down to increase or decrease the frequency digit by one step per keystroke. Keep the keys pressed to continue tuning until you release the keys.
The keyboard shortcuts are Alt+Left / Alt+Right and Alt+Up / Alt+Down correspondingly for Sub VFO B.
VFO Knobs
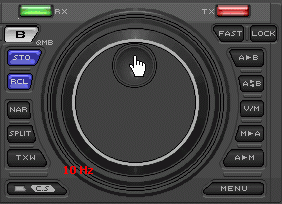 |
Another tuning alternative is to rotate the VFO knobs by using your mouse. The cursor changes to a hand symbol when you hold the mouse over the VFO wheel. Place the mouse cursor over the VFO knob slot, keep the left mouse button pressed and "turn" the VFO knob. It's almost like tuning the real radio. To change the dial step of the VFO double-click the VFO. Three dial steps are selectable with each double-click: 1Hz, 10Hz and 100Hz. A red-colored hint is shown for a few seconds. Same applies to Sub VFO wheel B. You can also use your mouse wheel to change frequency up or down. This however works only for Main VFO A. The dial step is determined by the selected frequency step (10kHz, 1kHz, 100Hz, 10Hz or 1Hz) |
Band Map
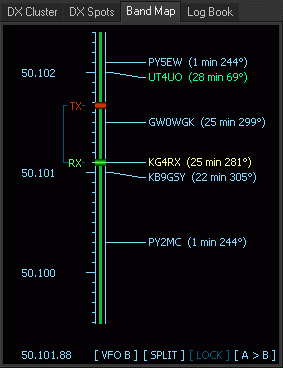 |
Compared to the real radio FTDXRC offers several advantages. One of them is the Band Map. It works for VFO A and B. The Band Map is filled with DX spots after you connect to a Telnet DX Cluster. Use keyboard shortcut Ctrl+A to set the focus into the Band Map (the buttons on the bottom will higlight) to be able to tune up and down the band using the mouse or the keyboard. It's not necessary to click into the panel, it receives the focus automatically after Ctrl+A. Use keyboard keys Up or Down to slowly fine-tune the VFO frequency or keyboard keys Page Up or Page Down to faster tune VFO frequency A or B. The green RX bar shows the VFO A receive frequency and the red TX bar the VFO B transmit frequency (in split operation). You can also use the mouse to tune a frequency by moving the green bar. You can also double-click on a DX spot, frequency A is set to the frequency of the spot. The Band Map has little blue arrows to be able to increase or to decrease the display resolution of the panels (zoom in/out). More information in the chapter Band Map. |
Clarifier
The Clarifier Bar Range is by default +/- 9999 Hz. The range of the clarifier slider in the application can be set to a lower range for better fine tuning to a signal (see Settings > User Interface). The following keyboard shortcuts help to faster control the Clarifier.
| Shortcut | Function |
| Ctrl+R | Set focus to Clarifier slider bar |
| Ctrl+Z | Clear Clarifier (reset to zero) |
| Ctrl+F1 | RX Clarifier on/oof |
| Ctrl+F2 | TX Clarifier on/oof |
| Shift+Up | Clarifier up |
| Shift+Down | Clarifier down |
Split Operation Hints
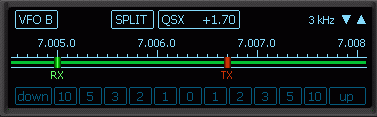 |
Use keyboard shortcut Ctrl+S to toggle split operation on and off. Use keyboard shortcut Ctrl+B to set the focus into the Tuning Panel. The captions will highlight. Use keyboard keys Left, Right, Up or Down to slowly tune VFO frequency B or keyboard keys Page Up or Page Down to faster tune VFO frequency B. |
The green RX bar shows the VFO A receive frequency and the red TX bar the VFO B transmit frequency. You can also use the mouse to tune transmit frequency B by moving the red TX bar. The split frequency offset (QSX) is always displayed above. The little blue arrows enable you to increase or to decrease the display resolution of the panel (zoom in/out).
Frequency Control can be changed from VFO B to VFO A and vice versa by clicking on VFO button
Click on the little 1, 2, 3, 5, 10 kHz Split Buttons to really quickly set the transceiver into split operation and to set VFO B 1, 2, 3 etc. kHz up (or down) with one mouse click.
Enter Transceiver Frequency
You can enter a new transceiver frequency in the call edit field of the Logging Window and VFO A of the transceiver will be set to the new entered frequency if you are on the same band as the entered frequency. You don't need to enter all digits of the frequency, the first relevant numbers ars sufficient. You are for example on 20m CW and you want to jump to 14020.0. Enter 1402 and hit Enter.
External Scrolling devices
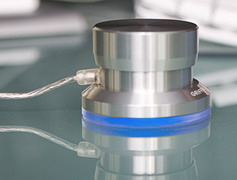 |
FTDXRC supports external scrolling devices for VFO tuning like the Griffin Technology USB PowerMate (see picture above). These devices use keyboard shortcuts to control applications. It is Ctrl+Up and Ctrl+Down to control Main VFO A and Alt+Up and Alt+Down to control Sub VFO B. |
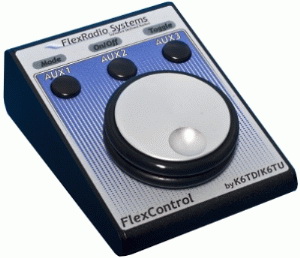 |
My favorite "VFO device" is the FlexRadio Systems® FlexControl™ USB Controlled Tuning Knob. It is fully integrated into FTDXRC and offers an accelerated tuning option. Read more... |
Reference: All Keyboard Shortcuts
Back to Documentation > Operating | Next: Changing Bands